Data Model - Object Relationship
Introduction
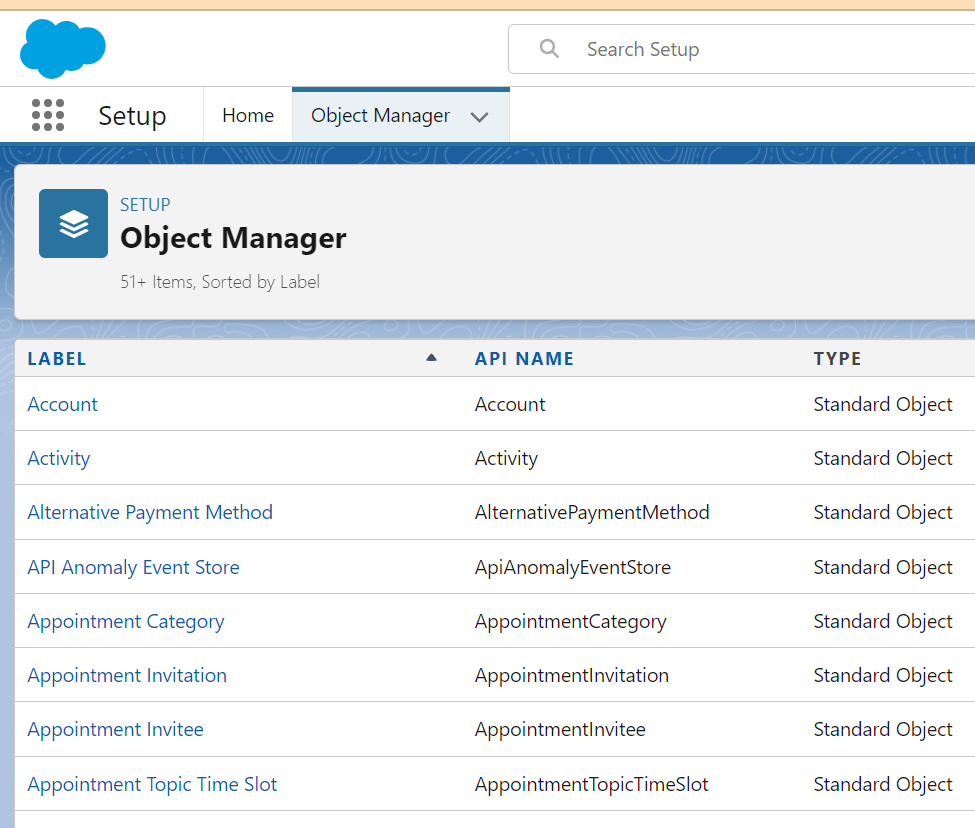
View all objects
Gear Icon → Setup → Object Manager
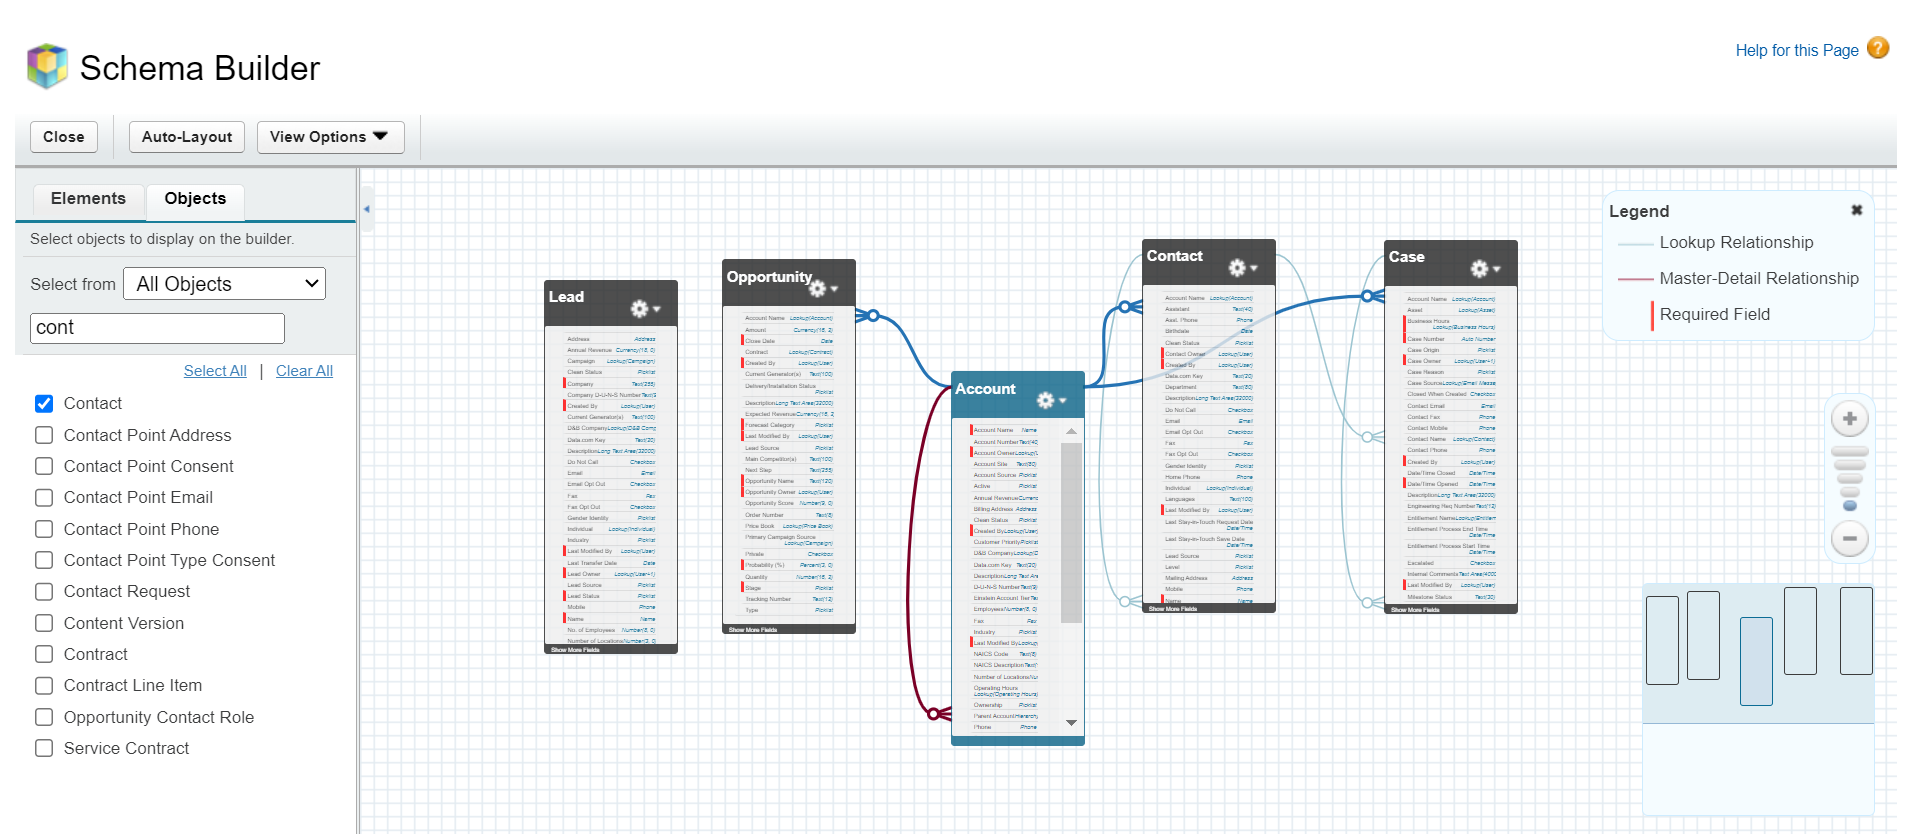
Schema builder

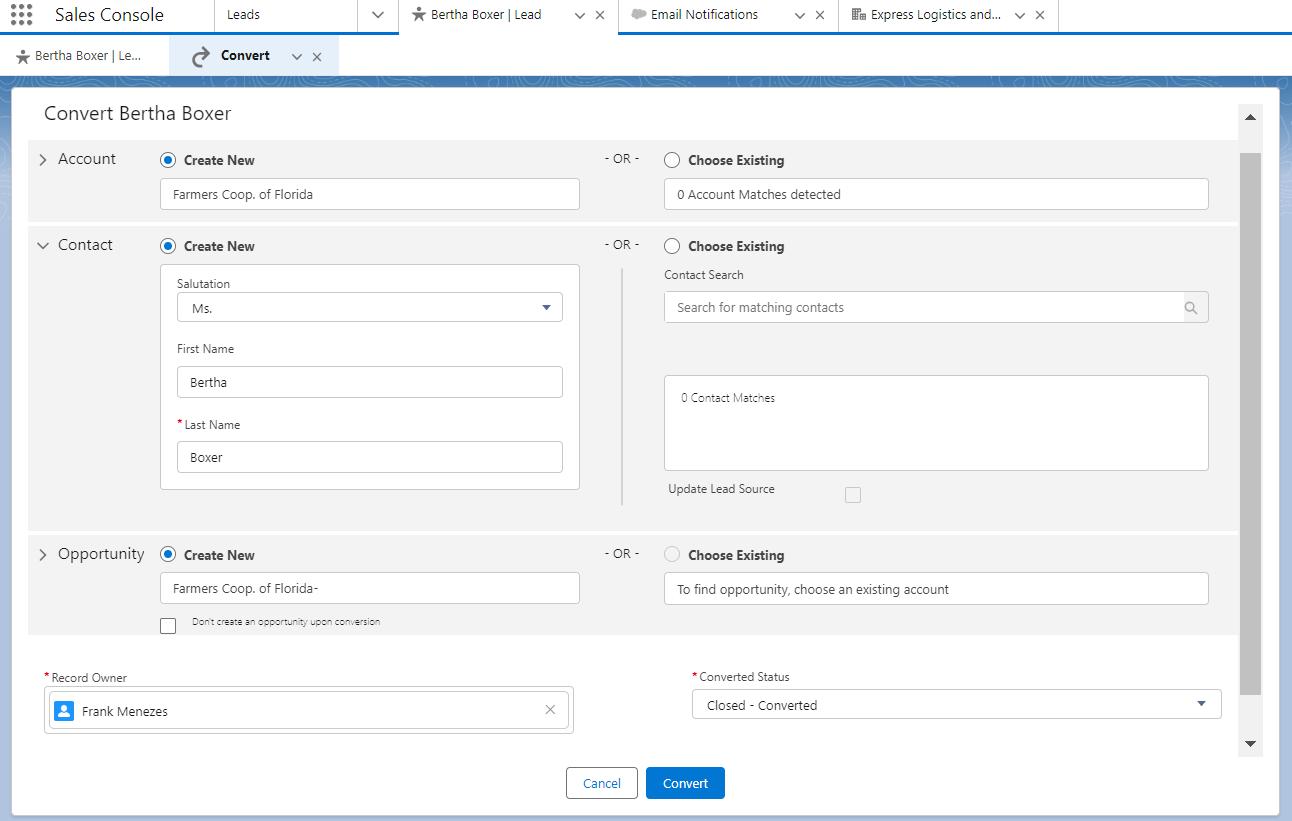
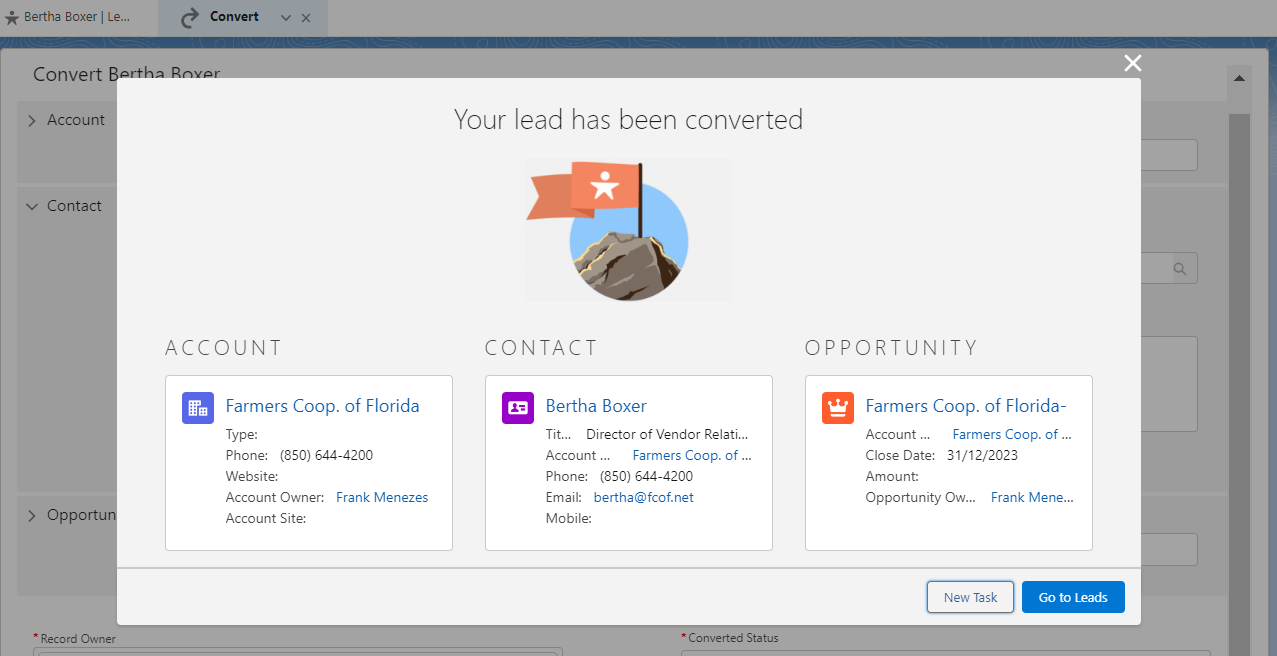
Lead Conversion Process
Creates (or assign existing) Account, Contact and Opportunity when you convert the lead.
Select a lead → Convert
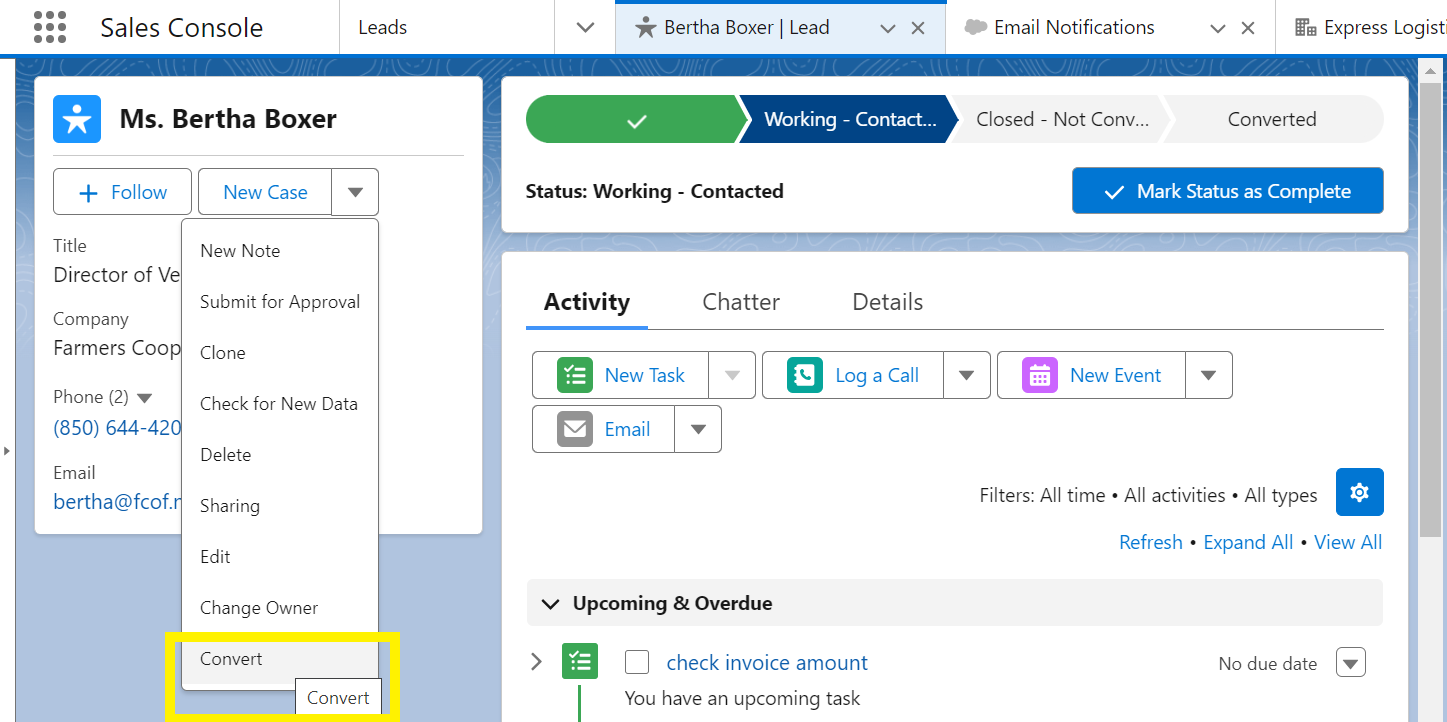
Convert Lead
Standard Objects
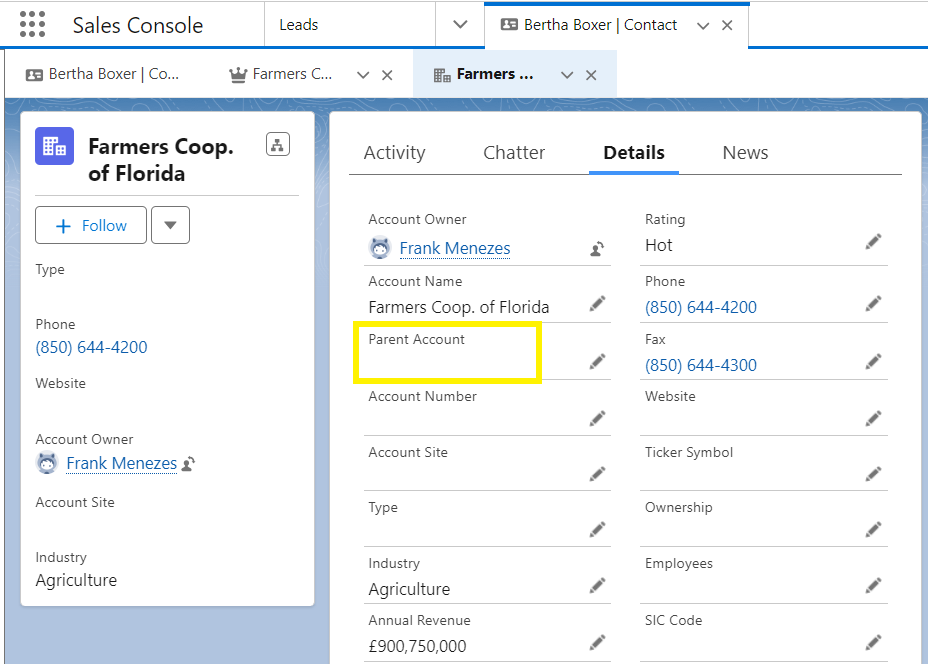
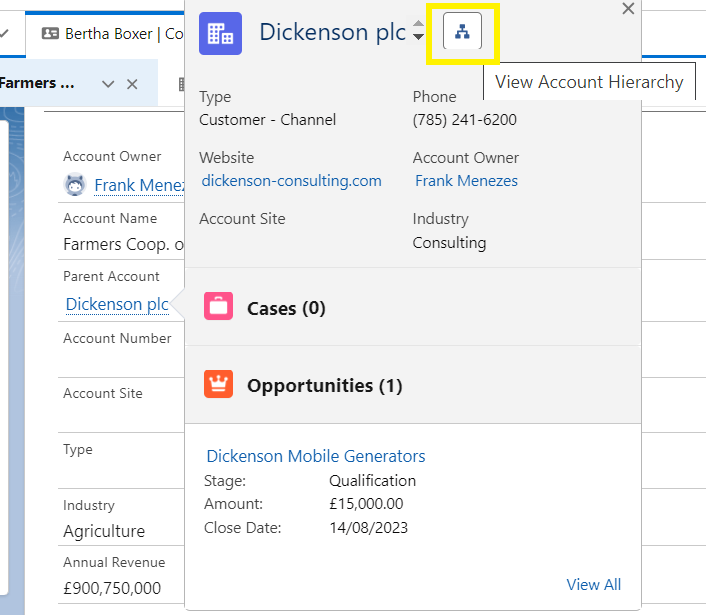
Account
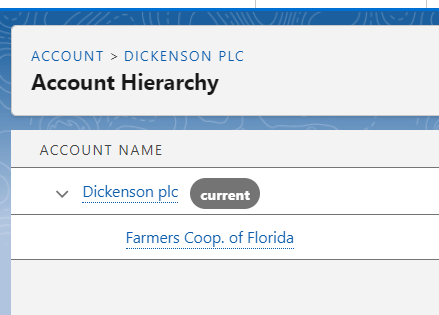
Account Hierarchy and Parent Accounts
Viewing it in the account page
Schema builder
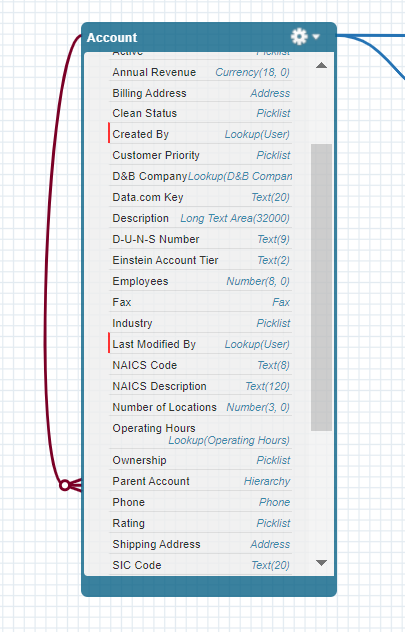
Hierarchy
Advantages
Contact
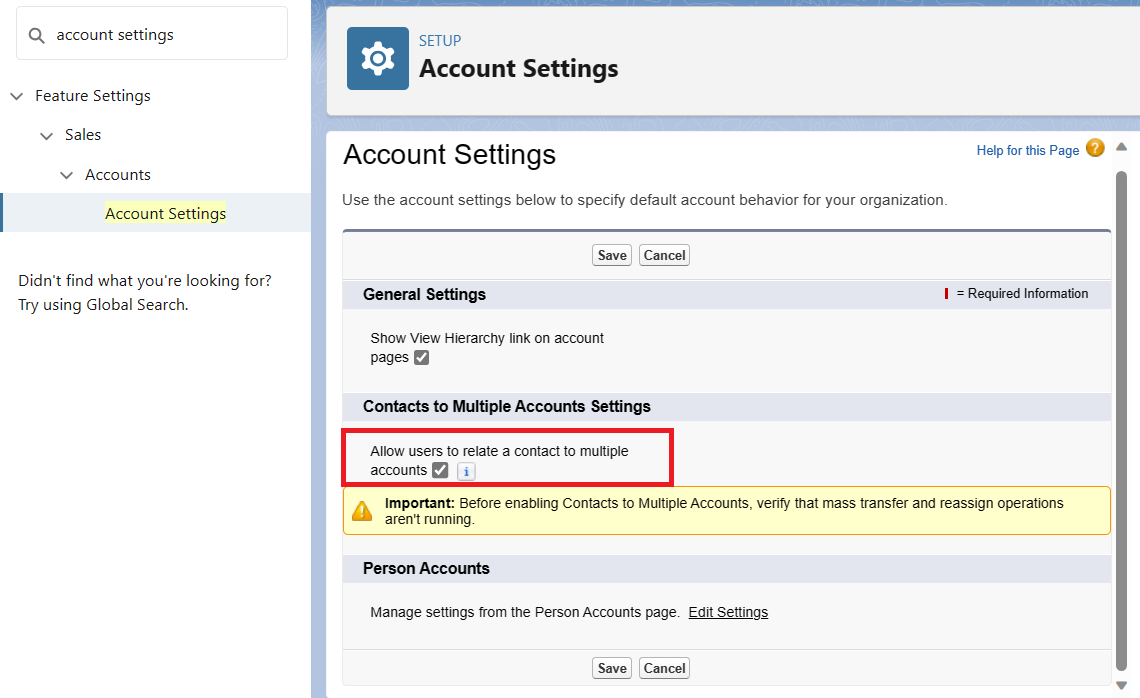
Enable contact to link to multiple accounts.
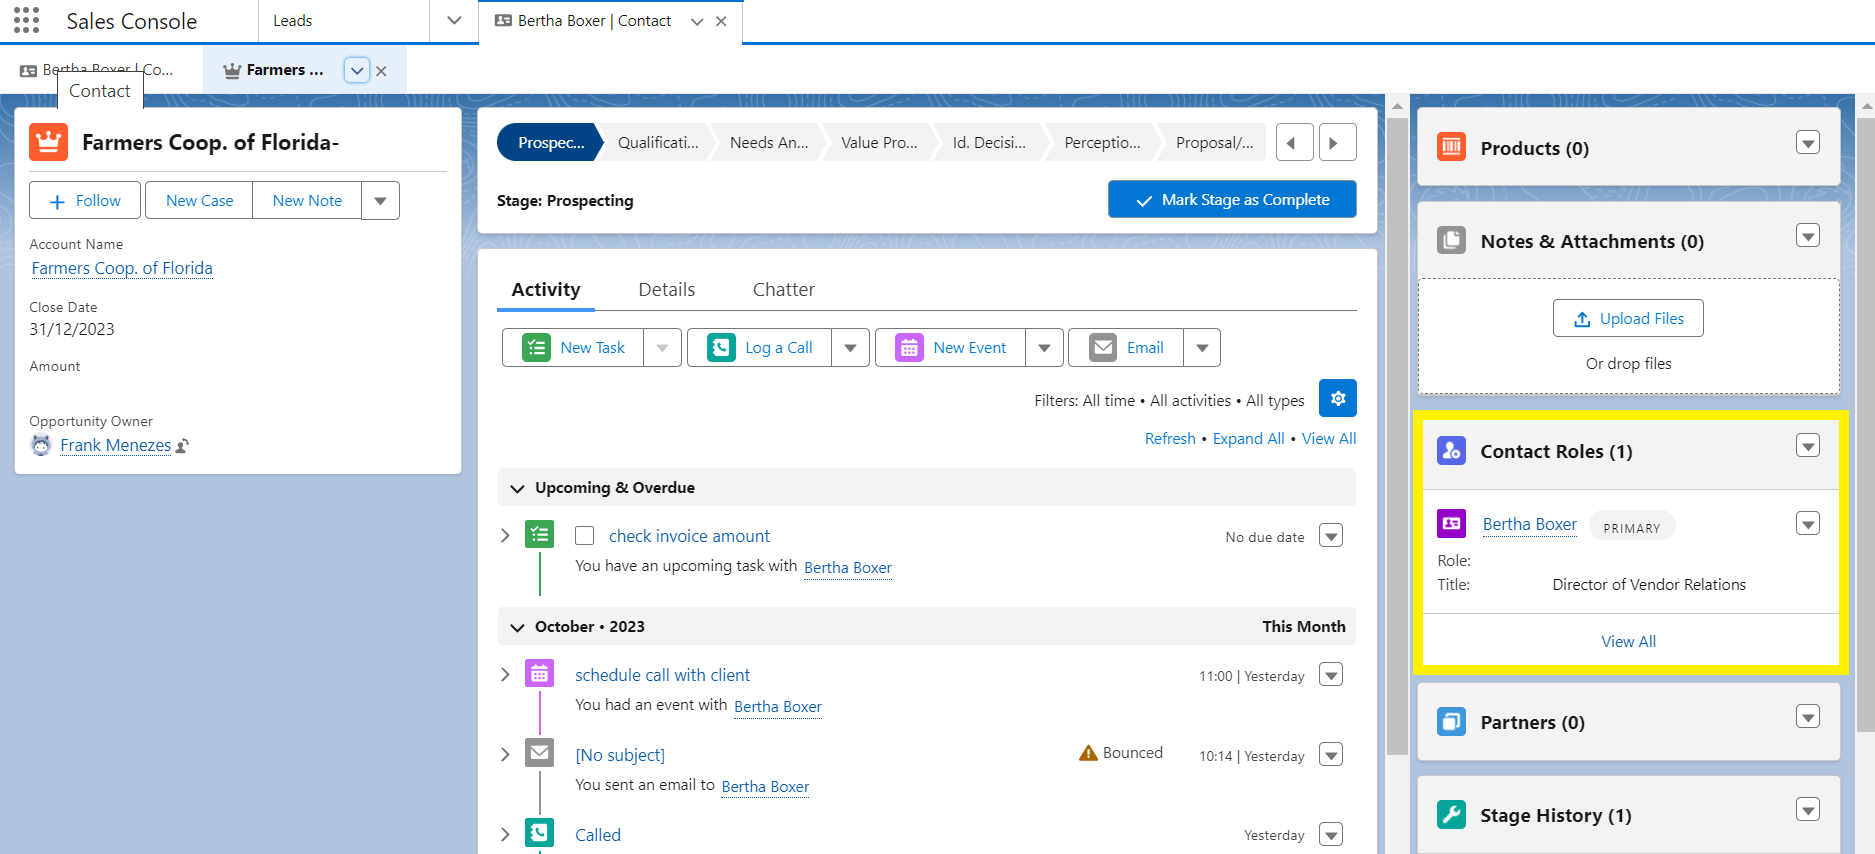
Opportunity Contact Role
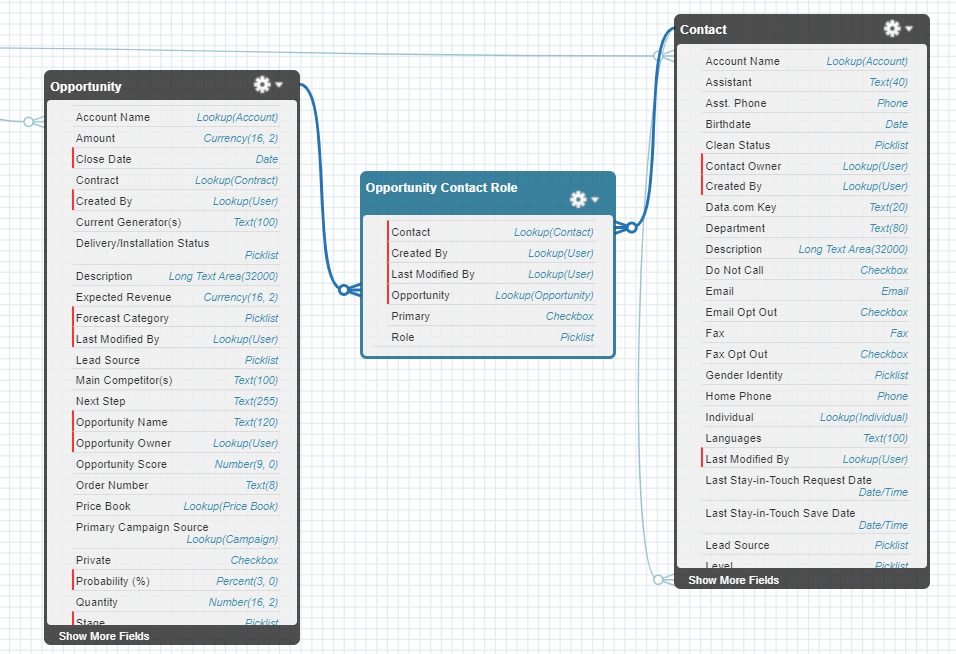
Account Contact Relationship
Difference between contact and related contacts
In Salesforce, there is a difference between ‘Contacts’ and ‘Related Contacts’.
- Contacts: Every Contact is still related to one account – think of it as a primary account. This is the account that appears in Account Name and is usually the company the contact is most closely associated with.
- Related Contacts: The ‘Related Contacts’ feature allows you to define relationships between contacts (individual people) and accounts (a business). With ‘Account Contact Relationships’, you can reconstruct reality with networks of individuals working with multiple accounts, or working with accounts in different capacities (e.g., employee, agent, partner, affiliate, contractor, etc.). This feature enables you to define the ‘role’ a contact has to their account, and any other account in your Salesforce org, if you wish to do so.
In other words, while every contact needs to be directly associated with an account (the primary account), any other accounts associated with the contact represent indirect relationships. These are captured under 'Related Contacts’.
Custom Objects
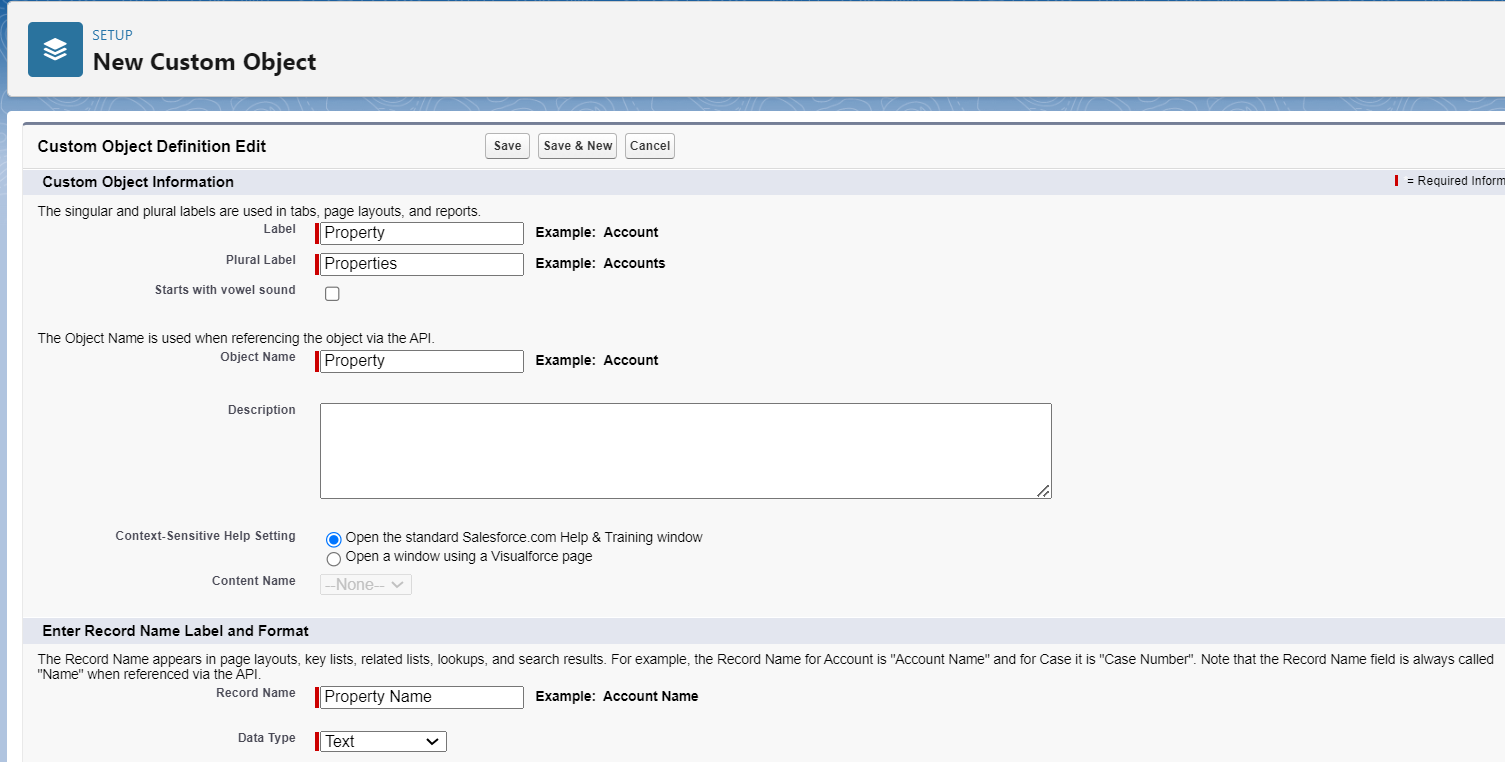
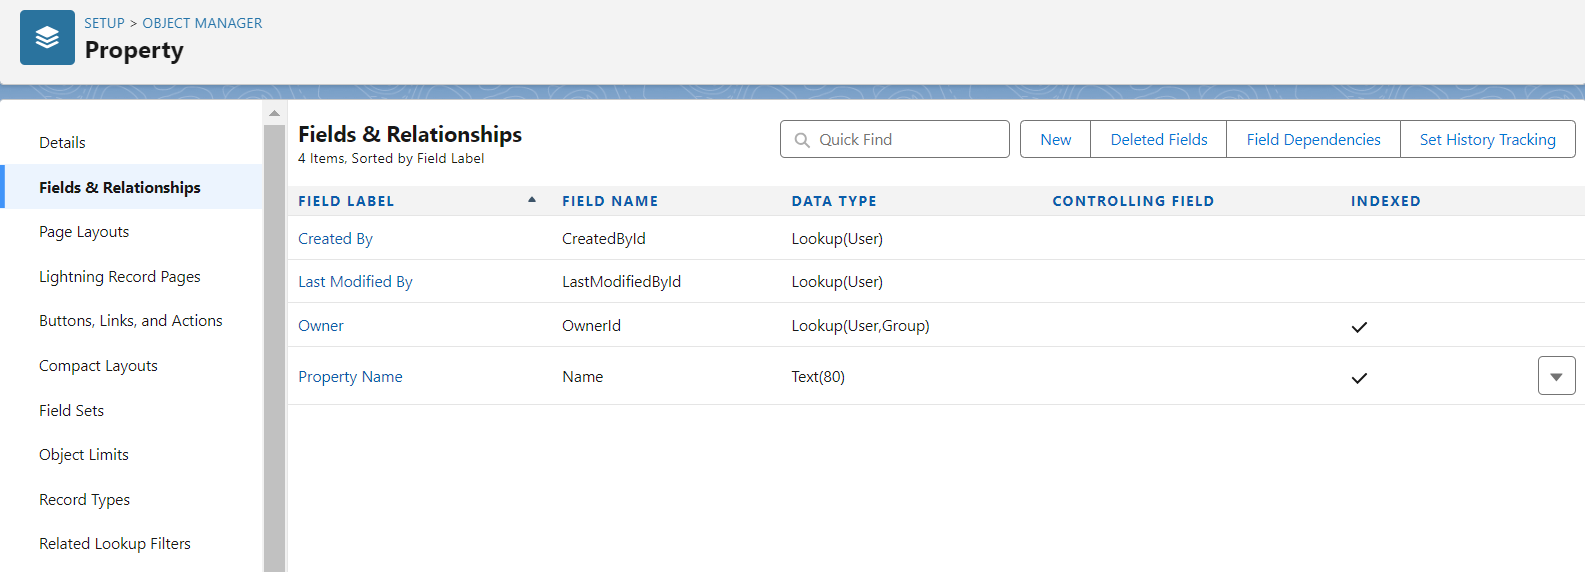
A custom object in Salesforce is a custom database table that allows you to store information that’s specific to your organization. For example, if you’re a real estate agent and need to track each home you’re selling, you can create a custom object called Property that shows which homes are for sale, pending, in the offer stage, sold, and so on.
Custom objects can be anything—you define the object and you define the type of info it contains. Once you’ve created your custom object, you can format it with standard or custom fields within the record to further track data and activities that are meaningful to your business.
To create a custom object in Salesforce:
- In your Salesforce org, click and select Setup to open Setup.
- Click the Object Manager tab.
- On the Object Manager page, click Create | Custom Object.
- For Label, enter whatever you want to call your custom object.
- For Plural Label, enter the plural form of your custom object name.
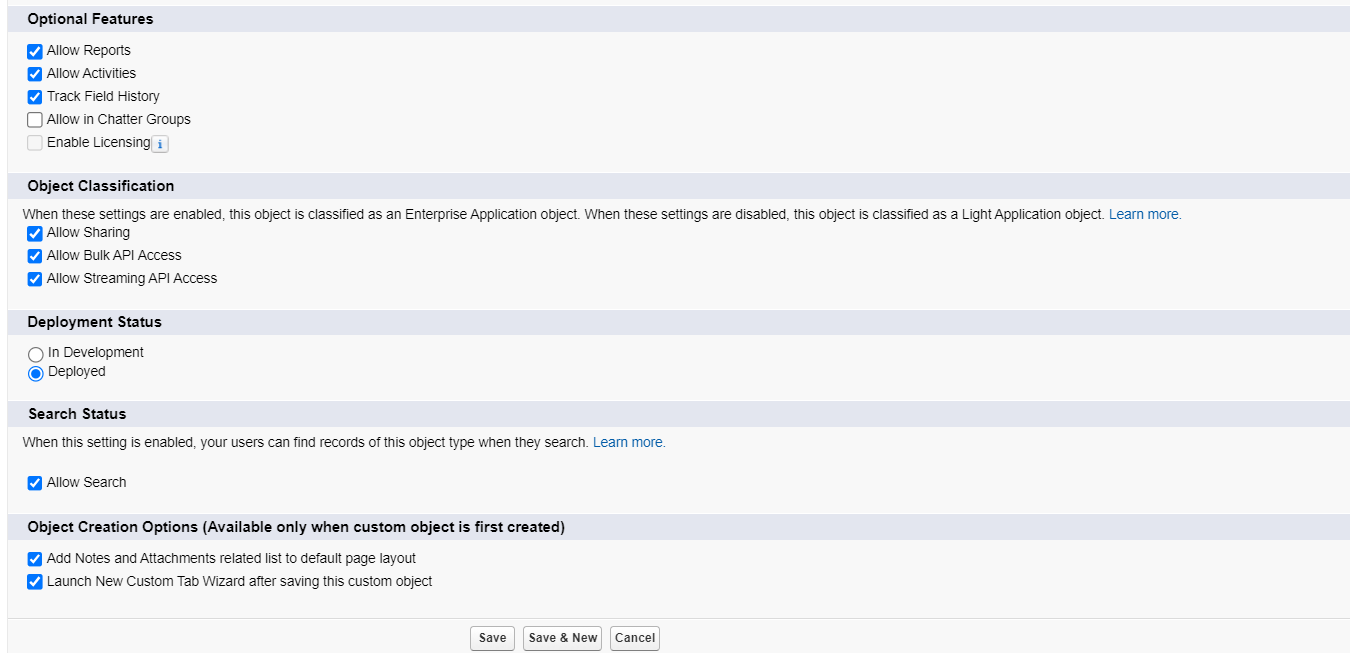
- Check the box for Launch New Custom Tab Wizard after saving this custom object.
Custom objects extend standard functionality and store information that is unique to an org.
Create custom object
Object Manager → Create → New custom object
Step 1: Basic settings
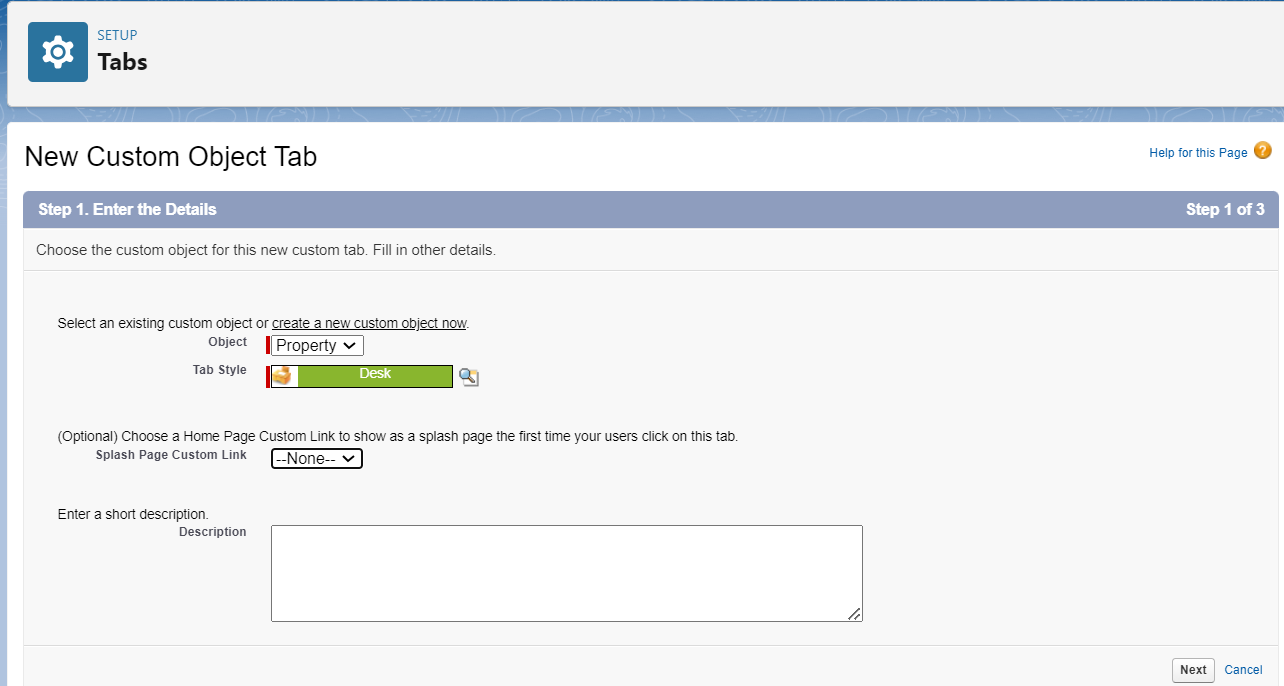
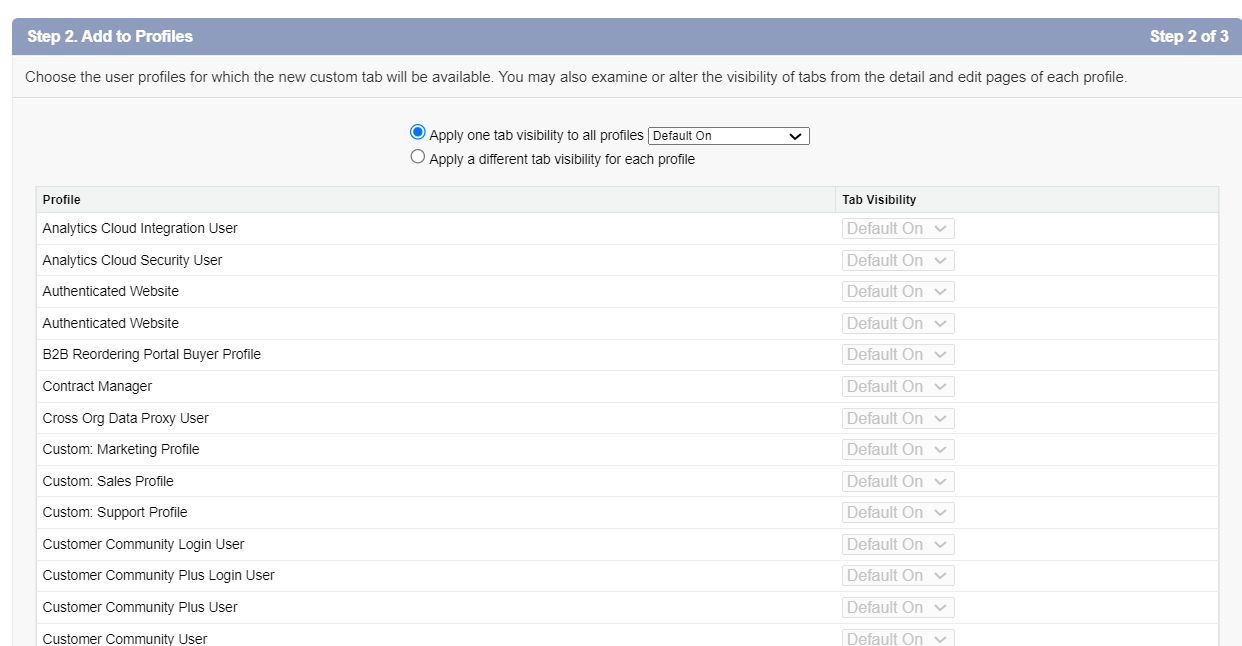
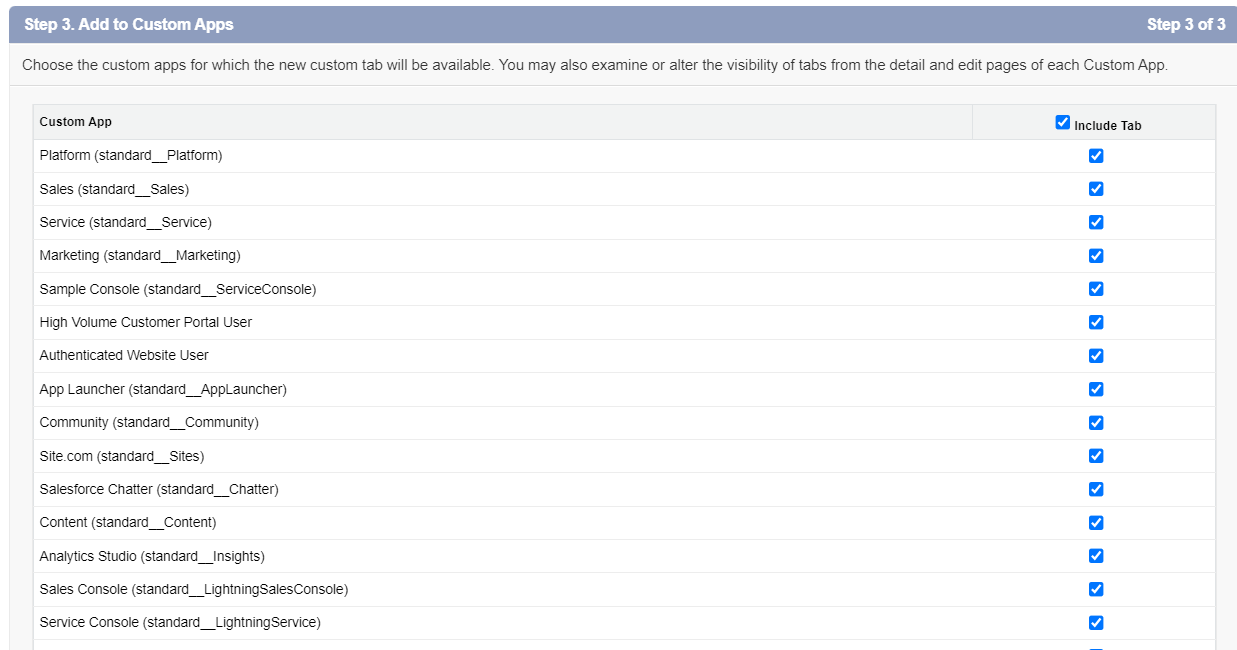
Step 2: Tabs
- Custom tabs let you display custom object data or other web content in Salesforce.
- When you add a custom tab to an app in Salesforce Classic, it appears as a tab.
- When you add a custom tab to an app in Lightning Experience, it appears as an item in the app’s navigation bar and in the App Launcher.
Step 3: View default fields created
Create custom LOOKUP field
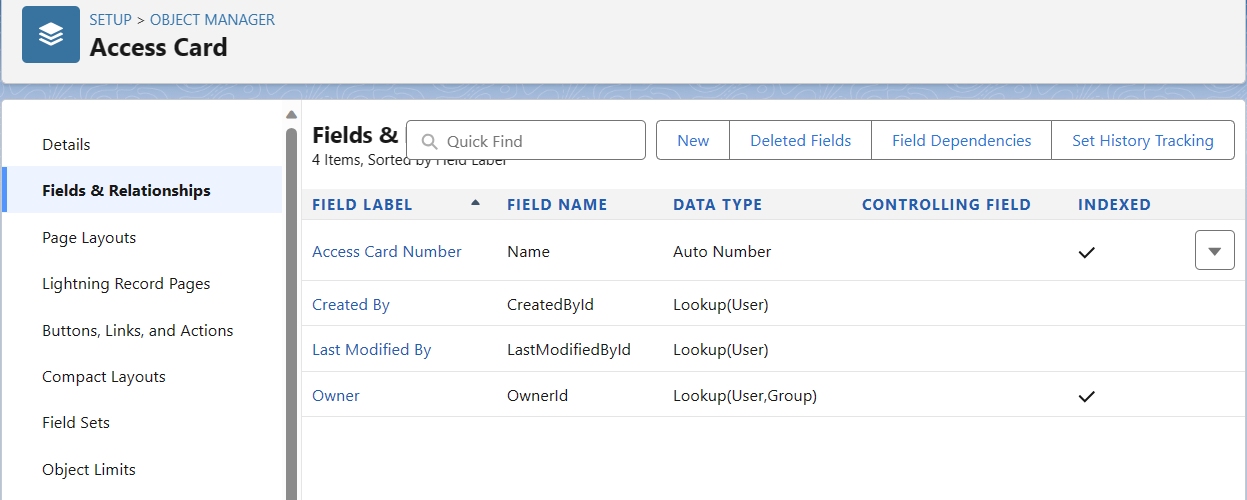
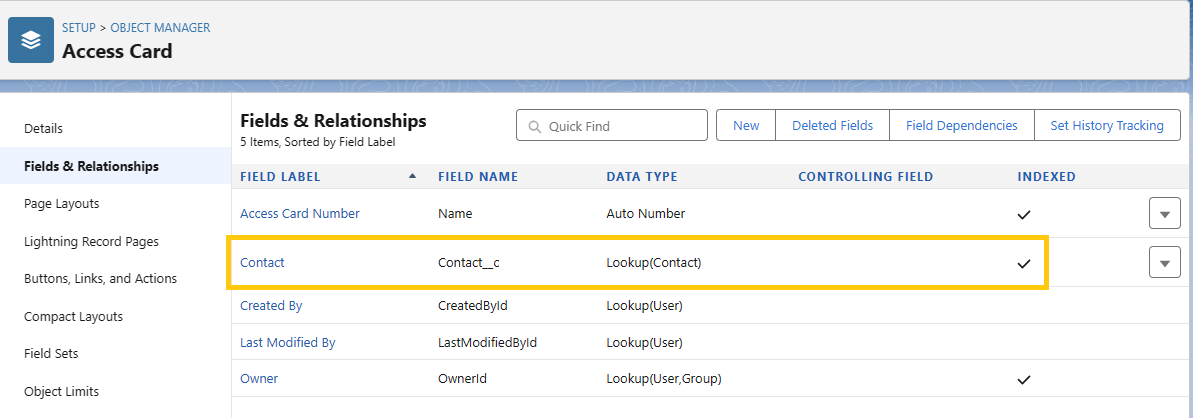
Lets consider a new custom object card Access Card like below.
New → Lookup → Related To (Contact)
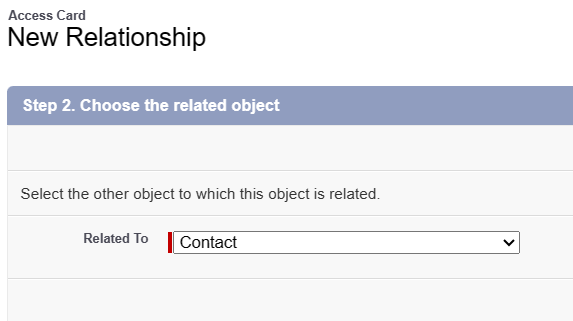
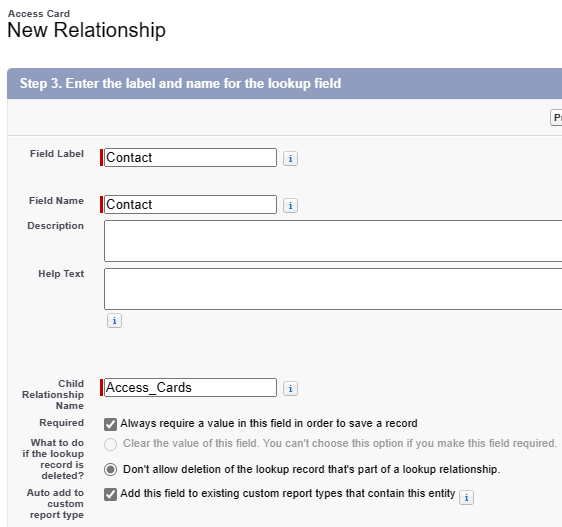
Enter Label and Name
Now we have the new field
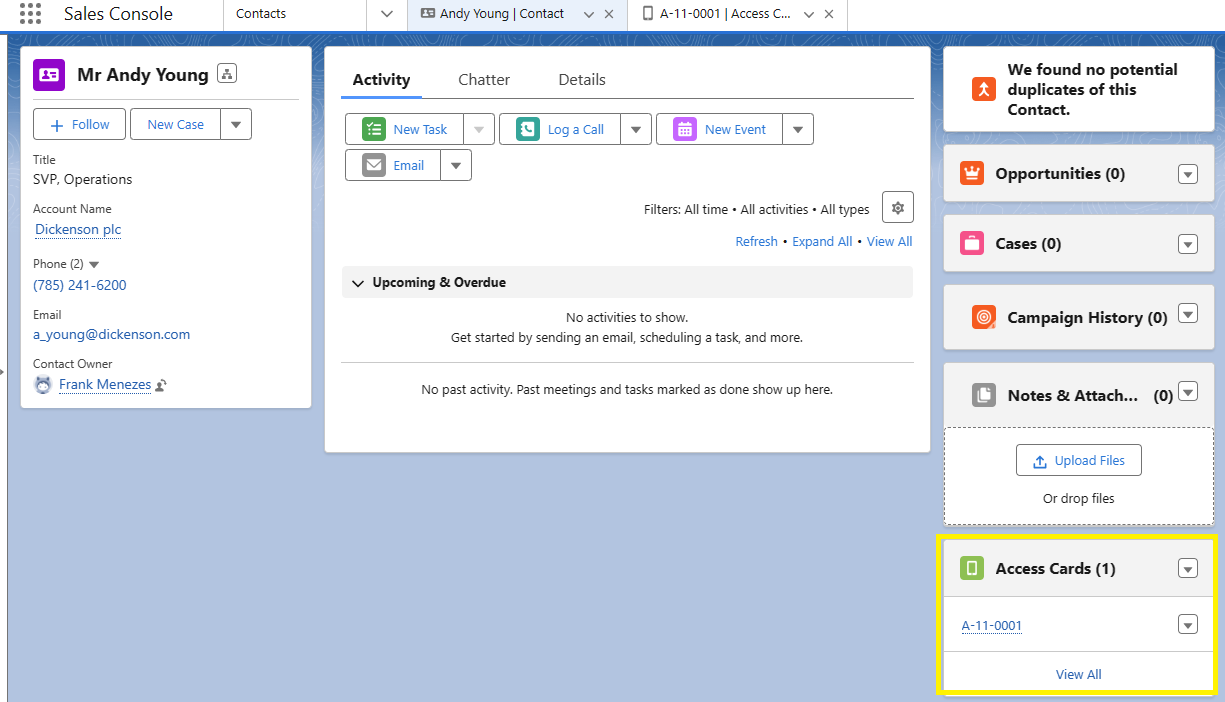
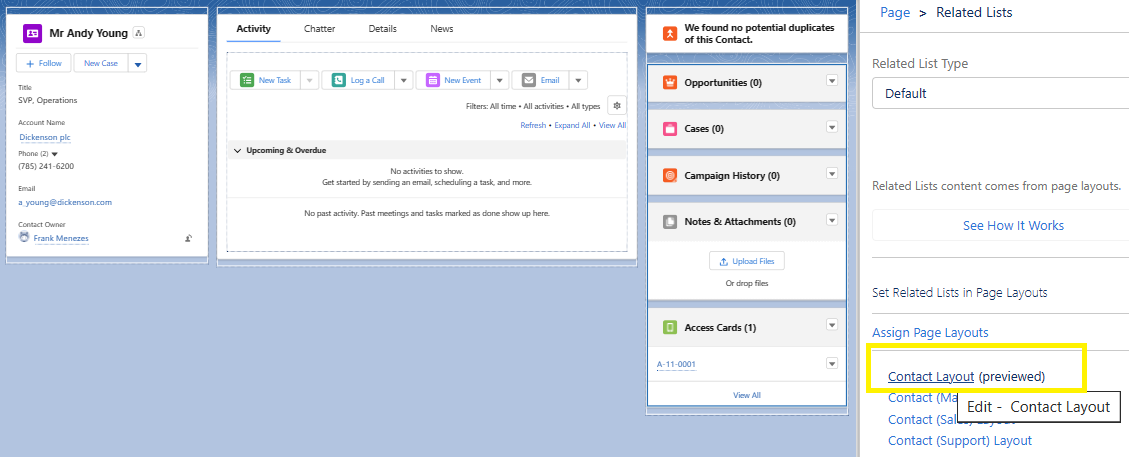
Create a new access card and assign it to a contact.

You can now view the access card included in contact.
Create custom PICK LIST field
Object Manager → Access Card → Fields and Relationships → New → Choose Picklist
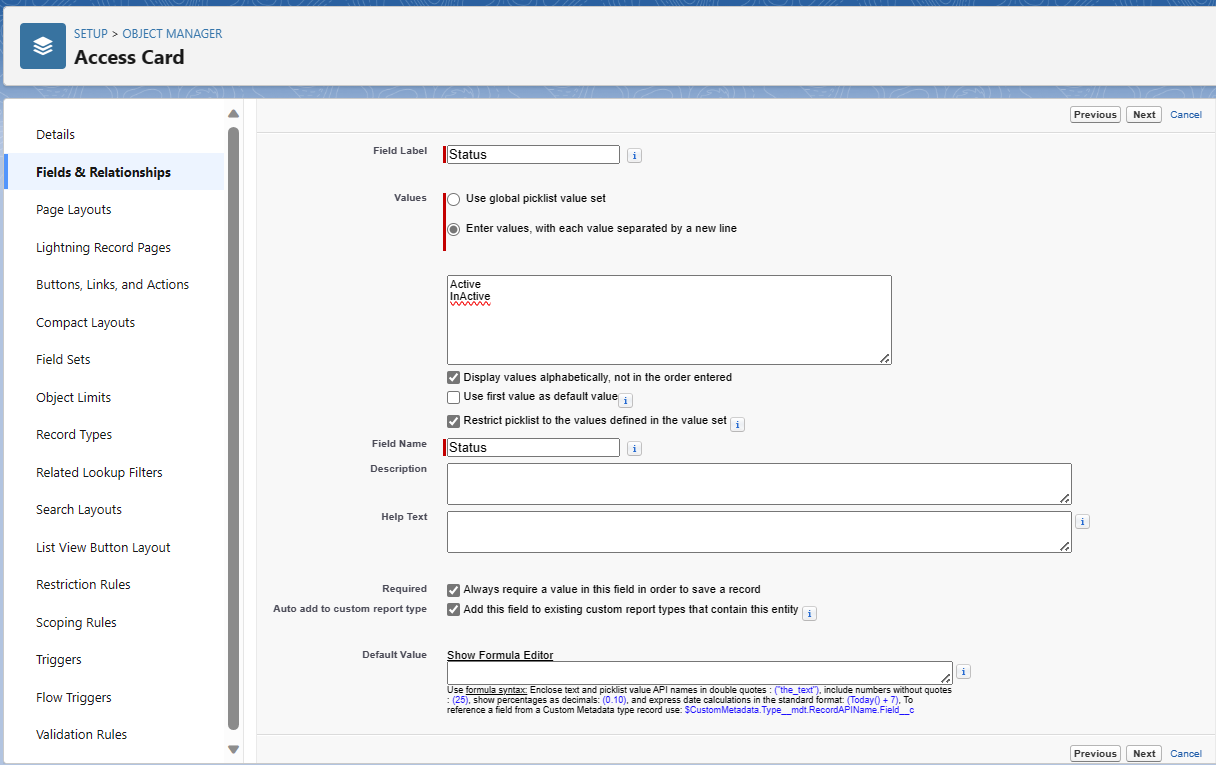
Update Status for existing access card

Editing Related List (Page Layout)
Click on edit page

Click on the previewed page layout
Select Access card and drag it all the way to the top. Save the page layout.
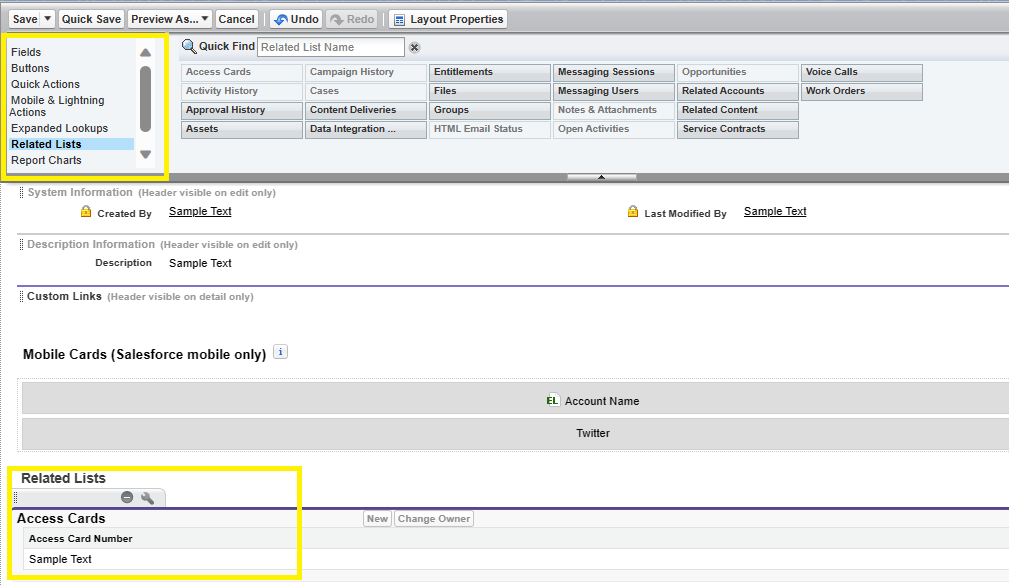
Refresh the contacts page and you should see the access card in related lists all the way to the top.
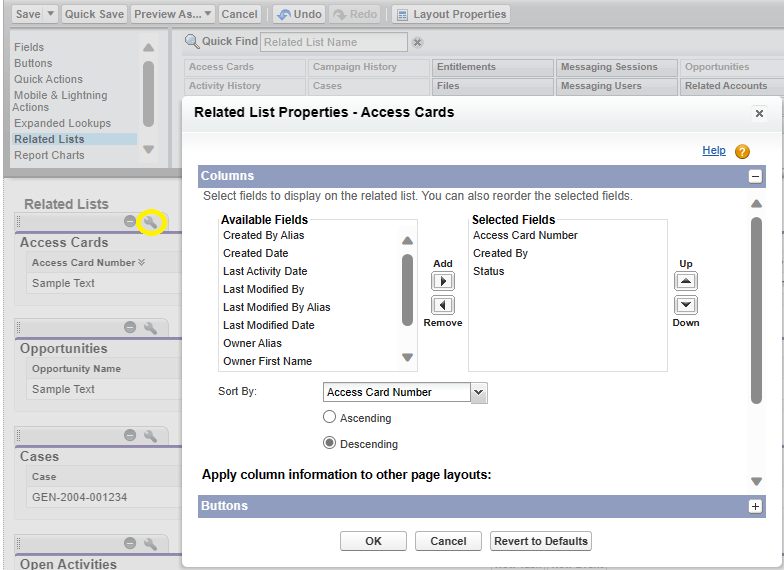
Also you can add more fields to your related list as shown below.
Master-Detail Relationships
-
Difference between Master-Detail and Lookup
In Salesforce, the choice between using a Master-Detail relationship and a Lookup relationship for objects is significant as it impacts data model design, record access, and cascade behaviors. Here are the main differences:
- Ownership and Dependence:
- Master-Detail: Strongly coupled. The detail record's lifecycle (creation, existence, deletion) is dependent on the master record. Deleting the master record also deletes the related detail records.
- Lookup: Loosely coupled. The lookup relationship is similar to a pointer or reference to another record. Deleting the parent (lookup) record does not automatically delete the child records.
- Record Ownership and Security:
- Master-Detail: The detail record inherits the sharing and security settings from its master record. There's no separate sharing setting for detail records.
- Lookup: Each record (parent and child) can have its own sharing and security settings.
- Roll-Up Summary Fields:
- Master-Detail: Allows creation of roll-up summary fields to calculate data from the child records, such as the sum, average, min, max.
- Lookup: Does not support roll-up summary fields natively.
- Required Relationship:
- Master-Detail: Requires a parent record (mandatory relationship). A detail record cannot exist without a master record.
- Lookup: The relationship is optional. A child record can exist without a parent record.
When to use one over the other:
- Use Master-Detail when there is a strong, dependent relationship between the objects, where the child's lifecycle is tied to the parent, and you need roll-up summary fields or cascading record-level security. It's often used for tightly connected objects, like Invoice (master) and Invoice Line Items (details).
- Use Lookup for more flexible, less dependent associations where child records can exist independently of the parent, and separate security/sharing rules are required. It's suitable for connections like Contacts (child) to an Account (parent) where the contact can exist even if not linked to an account.
- Ownership and Dependence:
-
Contact has a lookup for Account however account doesn’t have a lookup for contact!
In Salesforce, the standard relationship between the Account and Contact objects is somewhat unique and is a key aspect of Salesforce's data model.
- Account to Contact: The Account object does not have a lookup field for Contact. Instead, it's the other way around. Each Contact has a standard lookup field that references an Account. This field is often used to associate a contact with a company or organization, reflecting the common business scenario where multiple contacts can be associated with a single account.
- Contact to Account: The Contact object has a standard lookup field for Account. This allows each contact to be linked to one Account, indicating which company or organization the contact is associated with.
This model allows for a one-to-many relationship where one Account can have multiple associated Contacts. However, it's not a strict one-to-one relationship where each Account must have a corresponding Contact and vice versa.
The reason for this design is practical: in the business world, companies (Accounts) usually have multiple contacts (people), but each contact is typically associated with one primary company at any given time. This setup in Salesforce reflects and accommodates such common business relationships.
For scenarios where a more direct association between Accounts and specific Contacts is needed, custom junction objects or additional custom fields can be used to extend the data model.
-
How are related lists populated? Lets say I create a new object Access card which has a contact lookup
Related lists are populated based on the relationships defined between objects. Let's consider your example where you create a new custom object called "Access Card" with a lookup relationship to the standard Contact object. Here's how the related list would be populated:
- Creating the Relationship: When you create a lookup field on your "Access Card" object that references the Contact object, you establish a relationship between these two objects. Each "Access Card" record can be associated with a Contact record through this lookup field.
- Populating the Related List:
- When you link an "Access Card" record to a Contact (by selecting a Contact in the lookup field on the "Access Card"), Salesforce automatically understands this relationship.
- On the Contact record page, Salesforce will display a related list for "Access Cards". This related list will show all "Access Card" records that have been linked to that particular Contact.
- This related list is dynamically populated based on the existing relationships. As you create or link more "Access Card" records to a Contact, they will appear in this list.
- Viewing and Navigating:
- Users can view all "Access Card" records related to a Contact directly from the Contact's detail page.
- This makes it easy to navigate between related records and understand the relationships at a glance.
- Customization:
- Salesforce allows you to customize which fields are displayed in the related list, as well as the order in which they appear.
- You can also add buttons or actions specific to the related list, enhancing the user experience and interaction with the related records.
Changing look up field into master-detail
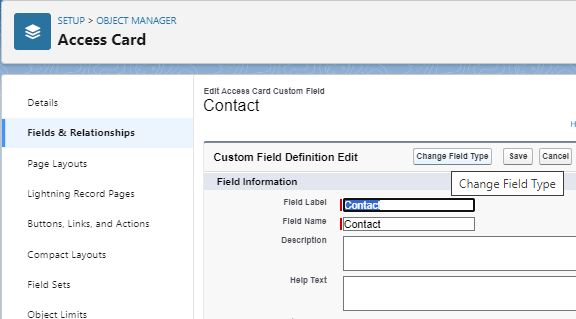
Step 1
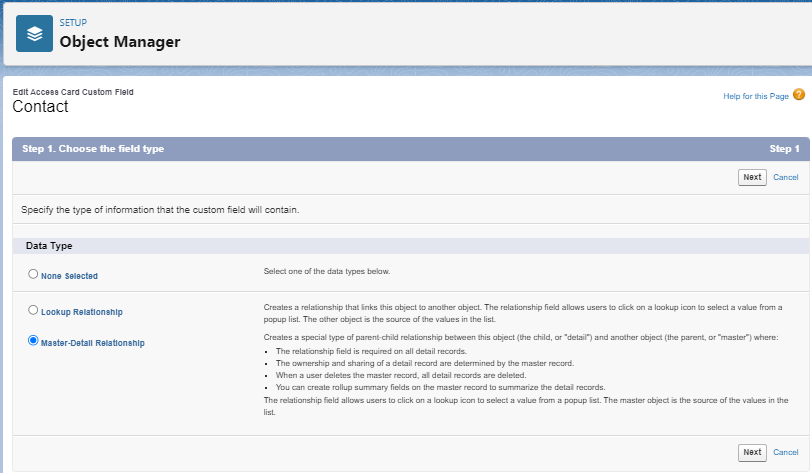
Step 2
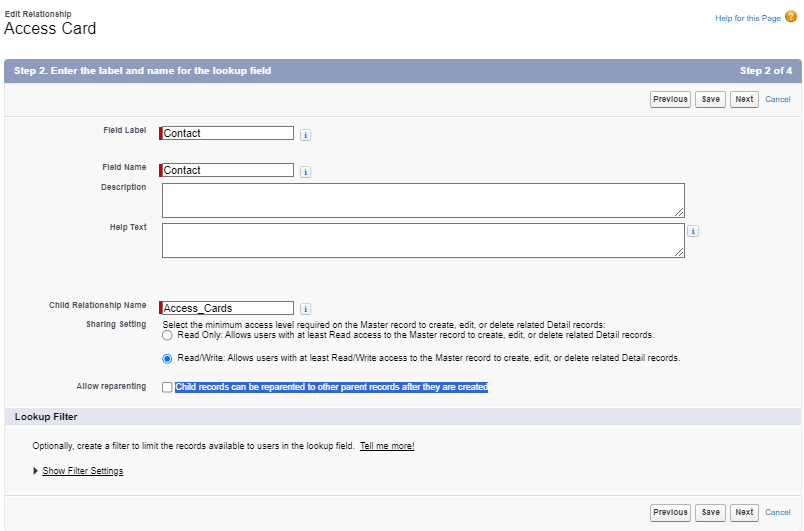
Step 3
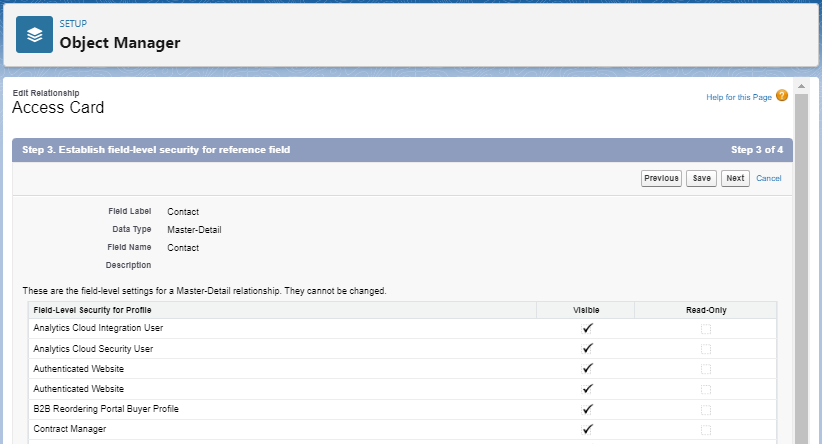
Step 4
Step 5
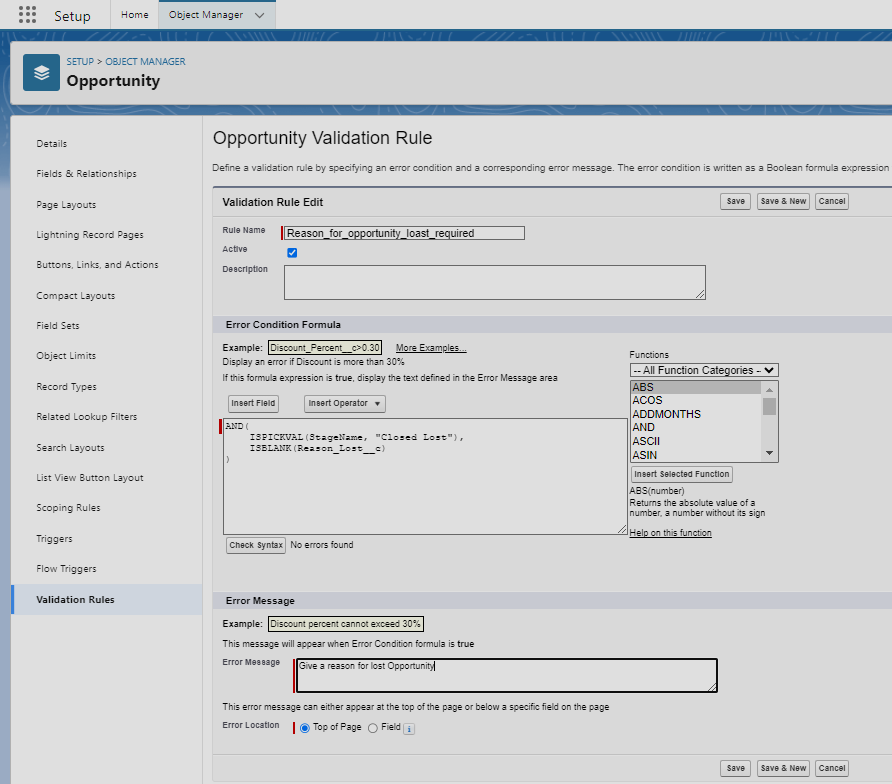
Creating and Testing validation rule
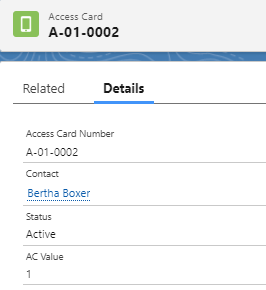
→ Create a formula field AC_Value in Access Card object. → Formula: IF(ISPICKVAL(Status__c, 'Active') , 1, 0)
Step 1
→ Create a Roll-Up summary field # Active Cards in Contact object


Step 2
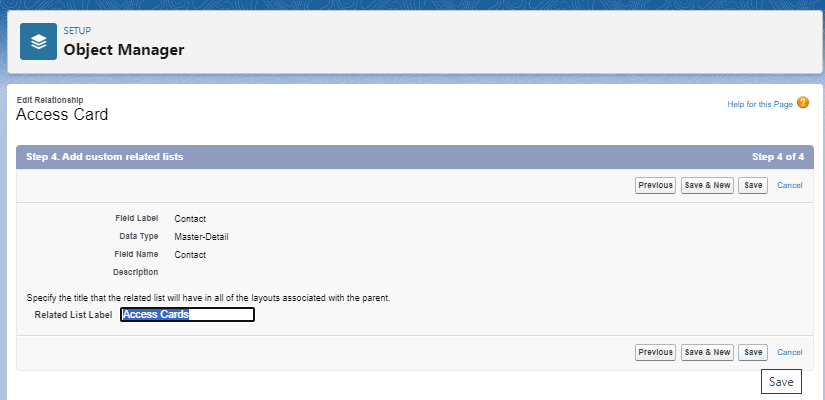
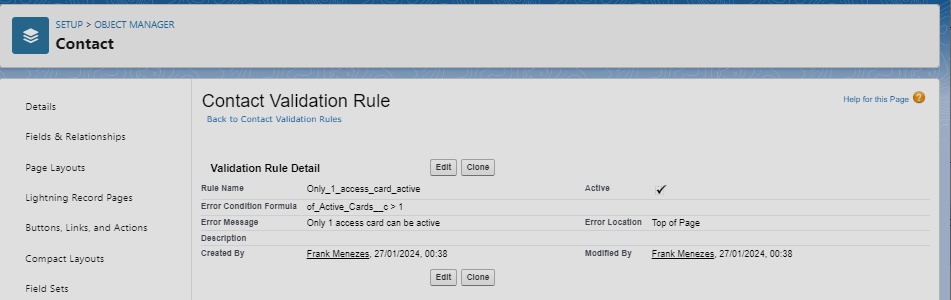
→ Create a validation rule on contact object object to allow only 1 access card active.
Step 3
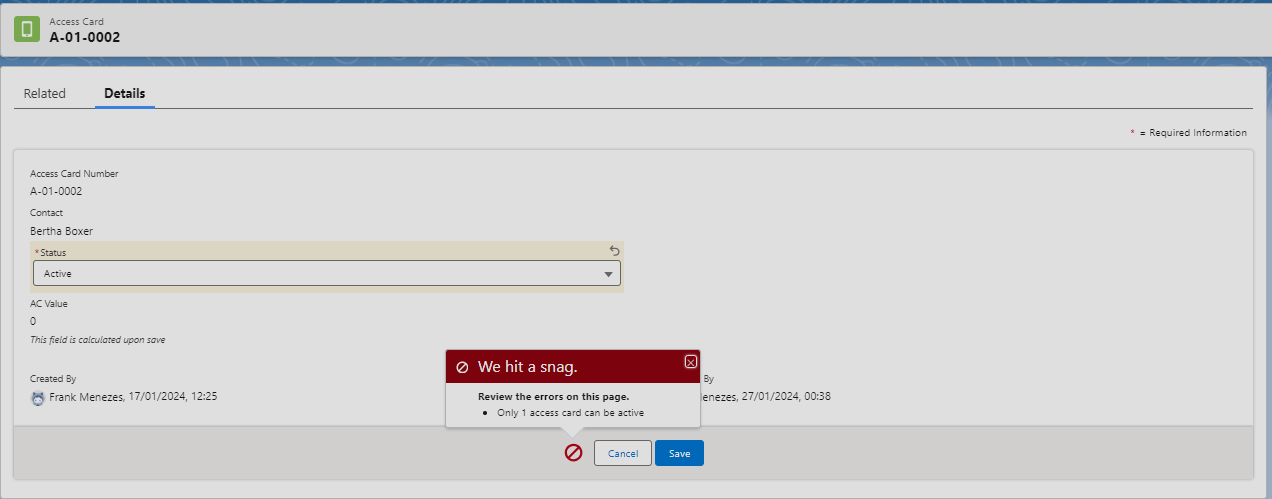
Now when you try to have more than one access cards, you get the below error you defined.
Step 4
Creating text area field with Validation
Create a Reason_Lost (text Area field) in Opportunity object.
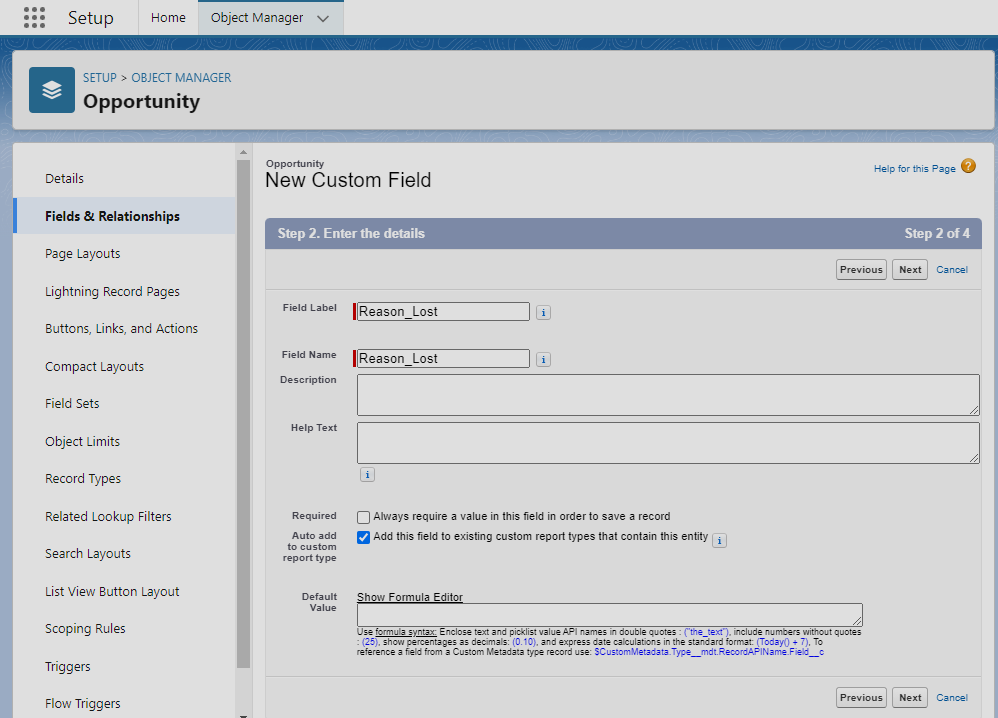
Go to Setup → Object Manager → Validation Rules
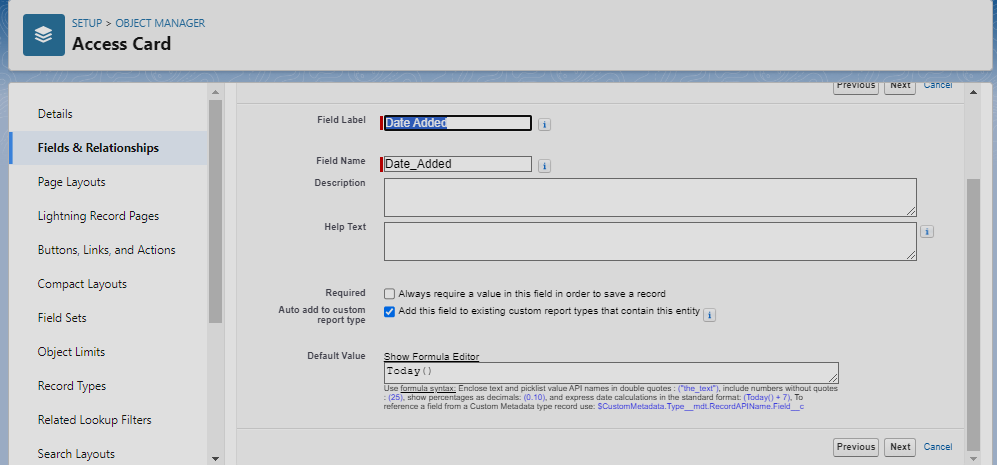
Setting Default Values using formula
Create a new Date Added field in Access cards and set its Default Value to Today()
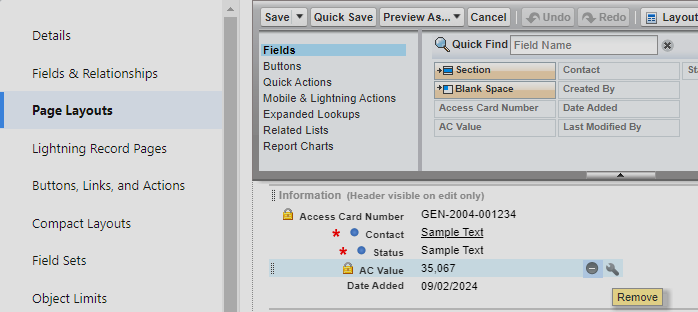
Removing Fields from page layout
Navigate to Object Manager → Access cards → Page Layouts (select remove)
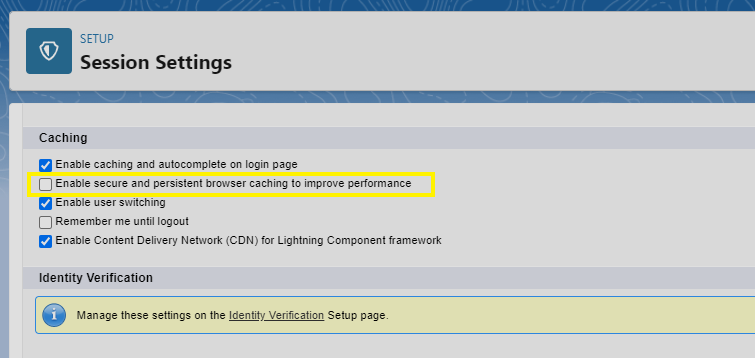
Disabling Cache in your Org
When you make changes to the page layout and it is not refreshed, do the below.
Navigate to Setup → Security → Session settings
Potential Data Loss when changing field types
Cannot change datatype for standard fields.
https://help.salesforce.com/s/articleView?id=sf.custom_field_types.htm&type=5
https://help.salesforce.com/s/articleView?id=sf.notes_on_changing_custom_field_types.htm&type=5
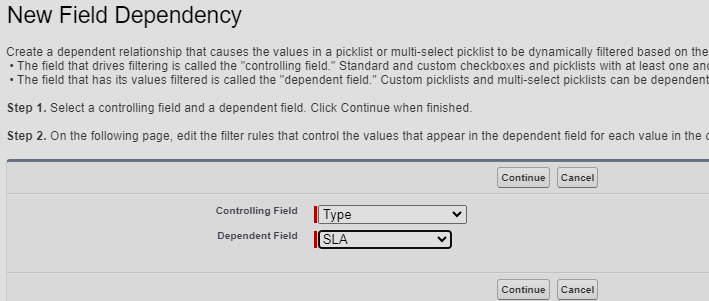
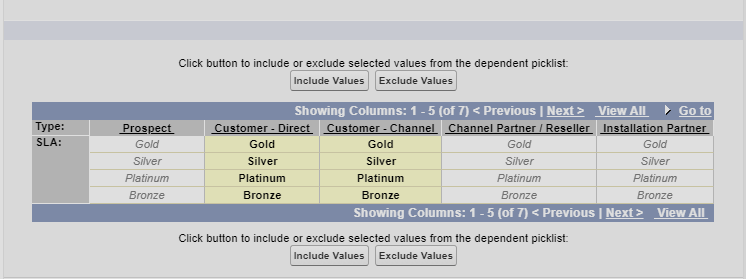
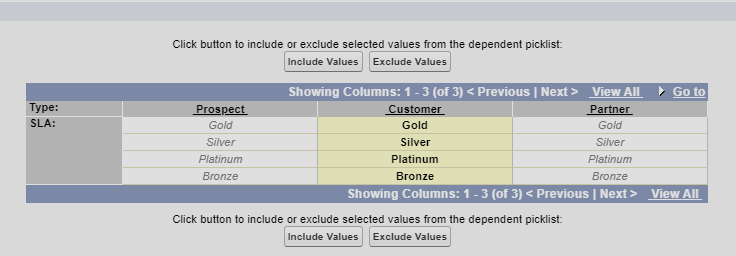
Dependent Picklists
Navigate to Object Manager (Account) → Fields and relationships → click on Field Dependencies.
Include values for only customers. Now you have SLAs only for customers and not for other types.
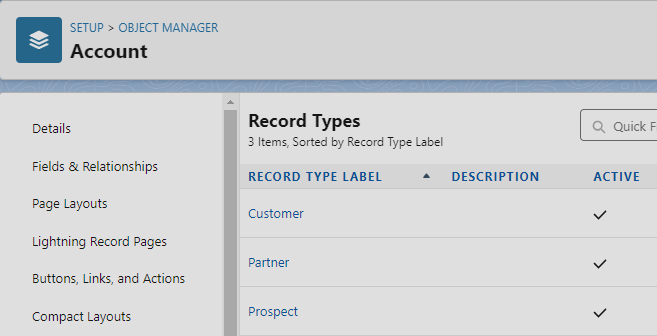
Creating Record Types
Navigate to Object Manager (Account) → Record Types.
Have only 3 Types - Customer, Partner and Prospect for this exercise. Redo previous step and dependency accordingly.
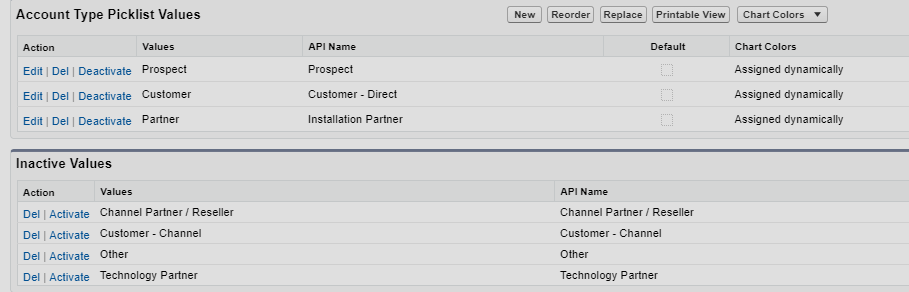
create 3 record types: Customer (Default Page Layout), Prospect (Default, Marketing Page Layout), Partner (Support Page Layout)
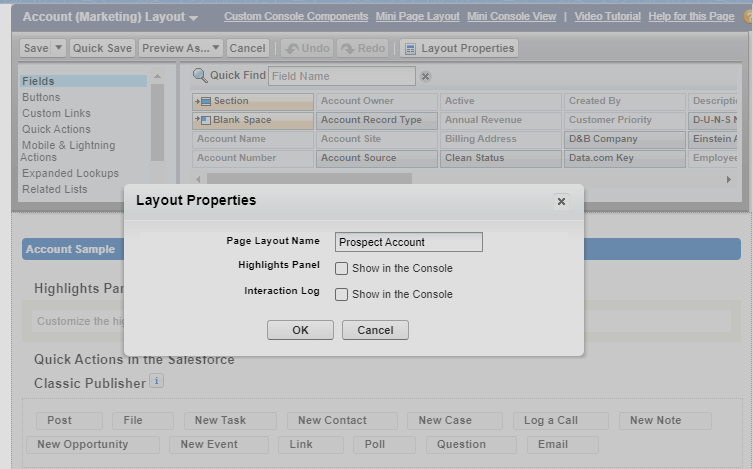
Renaming Page Layouts and removing fields
Record types are always tied to a page layout, so when you change a record type, its page layout changes.
Navigate to Object Manager (Account) → Page Layouts → click on a page layout
Change Account Layout → Customer Account, Account (Marketing) Layout to Prospect Account and Account (Support) Layout to Partner Account
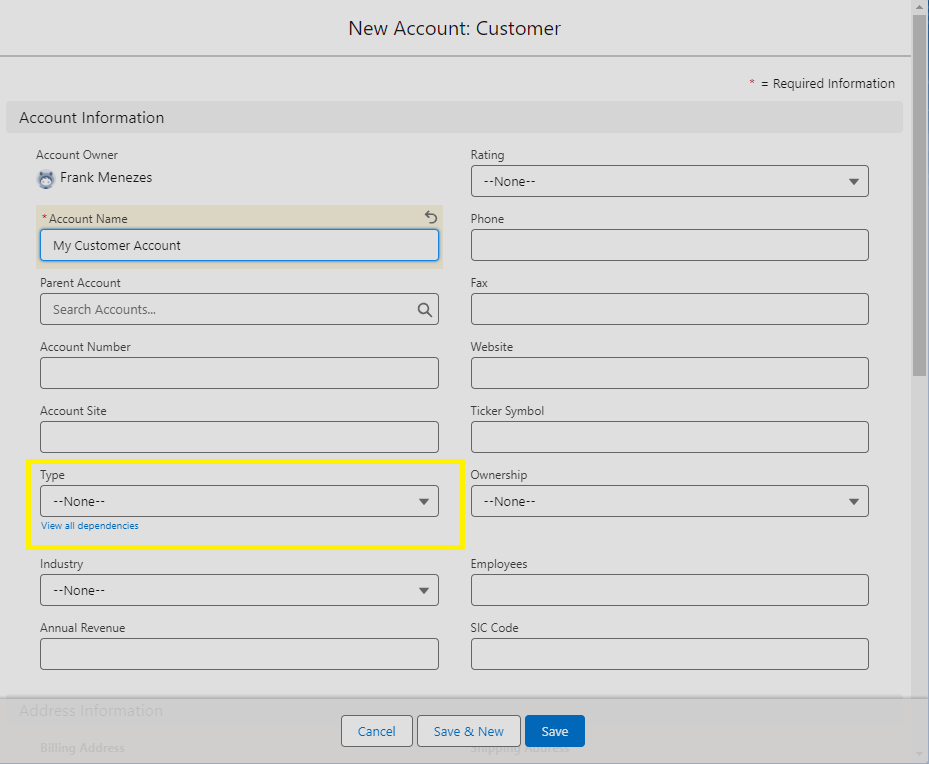
Remove all SLA related fields for Prospect and Partner Account page layout.
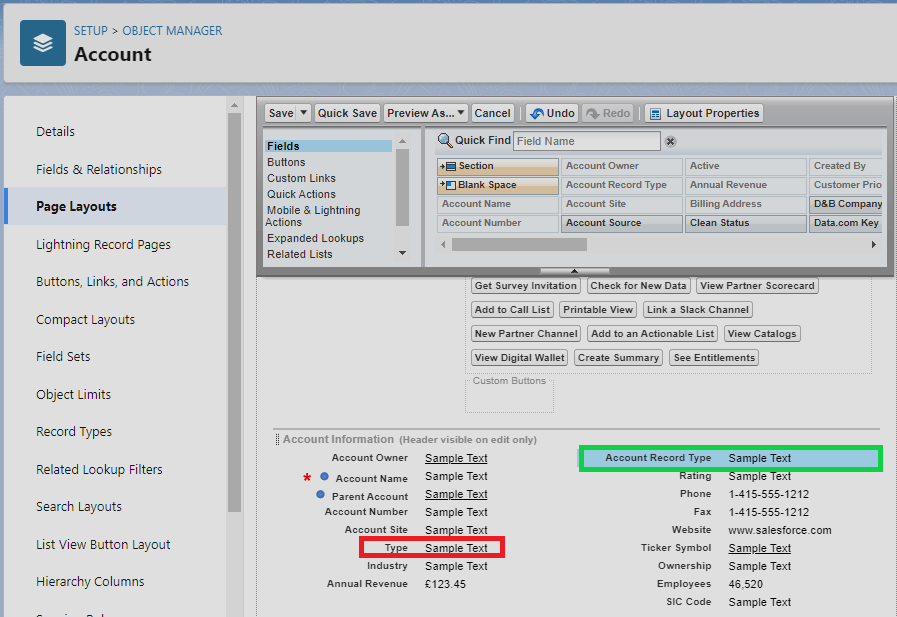
Create 3 new accounts - My Partner Account, My Customer Account and My Prospect Account selecting the right recordtype. (Do not select anything for type - we will refactor it later)
Removing Field Dependency
Navigate to Object Manager (Account) → Fields and relationships → click on Field Dependencies. (delete the field dependency)
Delete Type and add Account record Type field for all My Partner Account, My Customer Account and My Prospect Account page layouts.